Sunday 15 February 2015

BE AWARE OF THESE SCAMMERS!

 Hi Guys, 
On Friday night, Emily put her CBR 125 up for sale on Gumtree. 00:39 Saturday morning we had a text asking for the final price and to email them only. A few fishy messages later, we decided something wasn't right. I did a Google search for the email and name we had, and turned up a load of other Gumtree users who had fallen victim to them before. After reporting them to Action Fraud and Gumtree, we cut off communication with them and narrowly avoided falling victim as well. For those of you who sell/buy online look out for staciegooding23@gmail.com/07624803049 and longsam1133@gmail.com/texts from 'Sam'. We had the same messages from both of those contacts! The reports have been forwarded to the police as well.

Not such an exciting update right now, but felt the need to warn those of you who might be at risk of a scam! We will be back soon with more updates :) 

Cheers everyone! 

Saturday 14 February 2015

Money spending and progression! 14th February 2015

 OK, sorry guys I'm a little late updating. Yesterday was pretty successful, we mainly purchased stuff for the workshop like more sockets. This made Em happy, as I no longer have to keep stealing the desk and sockets, every time I want to solder! After a little, let's say INTERESTING, trip to Trago Mills, (We somehow managed to get lost, but I blame that on Emily as she was driving!) we came away with some more sockets, stocked up on electrical tape, a spark plug tester, and a few little miscellaneous bits like Nitrile Gloves and Solder etc.
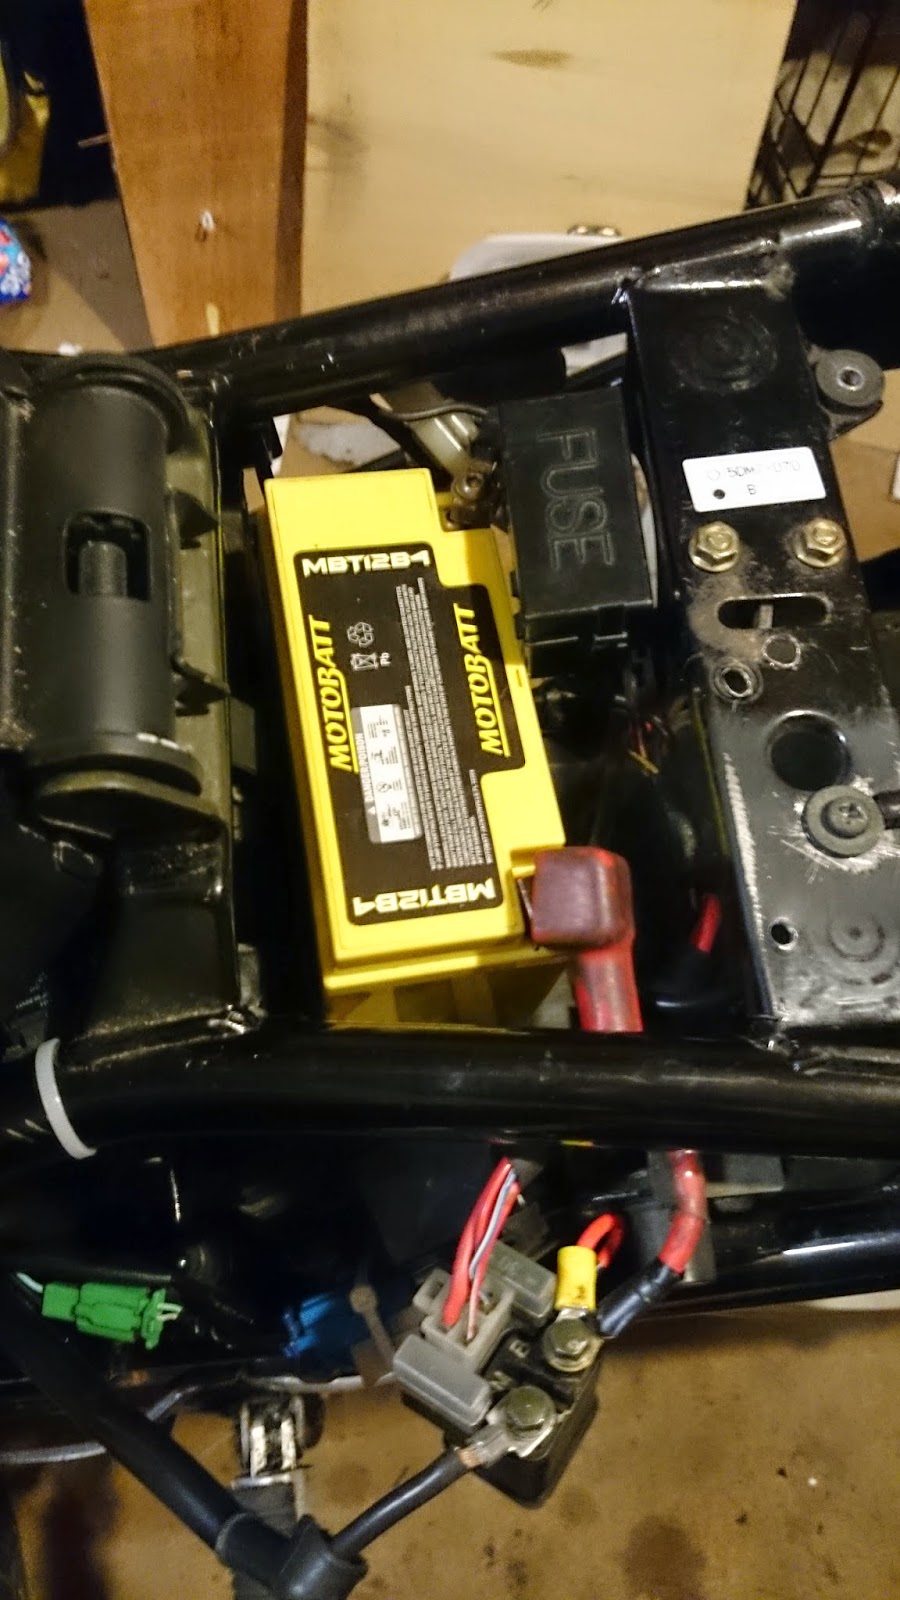
On the bike side of things, we only actually got a new Battery and some LED indicator 
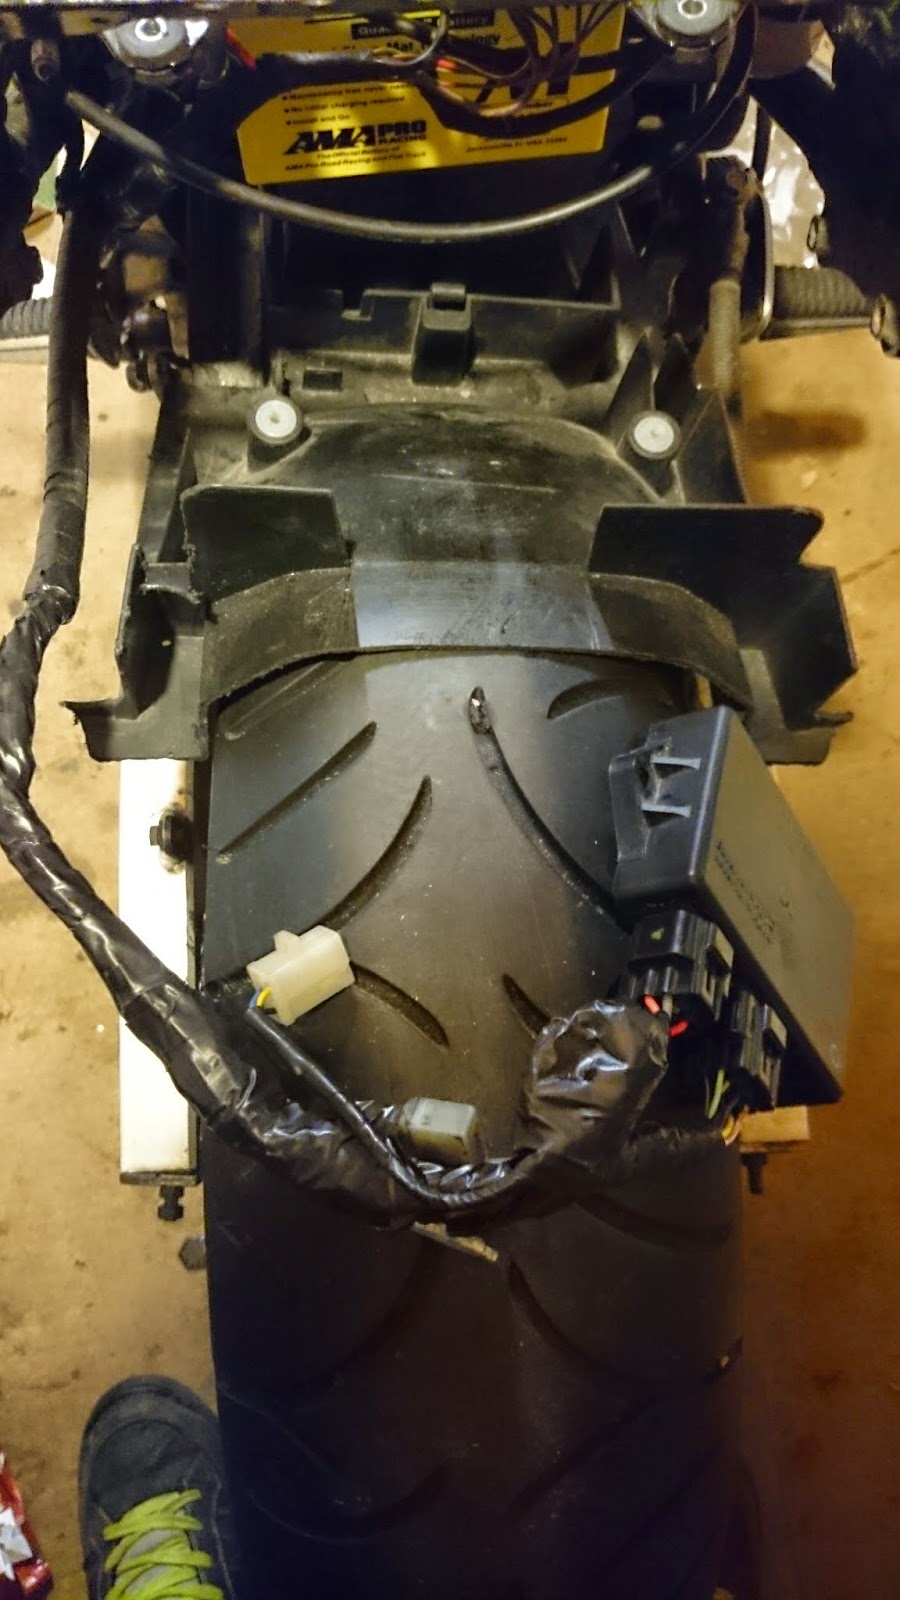
resistors for the back as I planned on tidying up the rear end of the wiring loom.

When we returned home, I installed the new Battery, and played with the wiring loom. The result was a nice fat bluey/purple SPARK!!!!!! It's a miracle! All the trouble we had, and it was just down to the old battery being down a cell and old. First (hopefully only, touch wood) big problem, dealt with. We then decided to take up the offer from a few friends, to go and meet them for dinner and few drinks, well needed! Probably should have come home a little earlier, what with Emily starting work at 8, this morning. None the less, some Steak and Kidney Pie with chips and buttered veg, accompanied by Strongbow and a few games of pool, went down a treat!


Onto this morning, with Emily off to work and my seemingly, increasing struggle with Insomnia, I had to get up and start fiddling! I began with putting up the new sockets, and finalizing where each wire needed to go on the end of the wiring loom, fitted the resistors and taped it up. It was at this stage I got a big boost of motivation, I was getting fed up of not having a spark, and running out of ideas!! I then decided it was best to get on with Emily's dinner and Valentines card, you know what it's like guys ;) 
The next step is to get Emily's bike sold, so we can purchase the exhaust system and to order some foam, so we can start creating a shape for the rear fairing. Coming along well now!
We have had some great help and tips from others in the biking community, the two wheeled world would not be the same without it!


We will back over the next few days, hopefully with a running bike!

Cheers everyone!

Max


Thursday 12 February 2015

Damn electrics.... 12th February 2015

So a small update today, but tomorrow is parts ordering day so stay tuned!

 I meant to say, before we got the new loom, the starter button wasn't doing anything. Temporarily to try the starter and see if she would turn over, I bridged the terminals on the starter relay with a switch. This allowed me to try turning her over but still didn't start. I tested for spark on all the plugs and there was nothing. Knowing that the wiring loom was dodgy somewhere, I crossed my fingers and hoped that was causing the dead spark issue. When the loom arrived it was swapped straight in for the old one. This fixed the starter button problem and was turning over as normal. However we still had no spark! I went through everything I could to isolate the problem, but to no avail. I tested all the microswitches i.e sidestand switch, clutch switch etc, although if it was either of the microswitches it wouldn't turn over anyway. Next I tested the resistance on the primary windings, secondary windings, leads and plug caps. The primary winding on coil 1 was a tad low at 2.5ohms so out of precaution I picked up a set of tested coils and leads from ebay. Fitted yet still no spark, but the resistance measured about 3ohms, so at least that has improved. Next I checked power going to the coils, without the starter pressed there's 11.89v there, (new battery asap!) but with the starter pressed it drops to 6.93v! A test of the rear lights, shows 12.01v then a drop to 6.95v with the starter engaged... I think we have a short somewhere -_-

I proceeded by stripping some of the casing on the main loom to check for any fouled or broken wires, to find a load of wires, gaffer tape, SELLOTAPE!! and bad crimp connections. The advert for the loom said it had never had an alarm/immobiliser fitted, after examining the wires I uncovered I beg to differ! Tomorrows job is too trace the loom too, hopefully, find a short somewhere.

Had Gus in the workshop again today, slowly settling down. UNTIL HE FIND A COOLANT HOSE...

Back tomorrow after we have ordered some parts.
Night guys! -Max

Monday 9 February 2015

22nd January - 9th February 2015 3...2...1... Dissapointment

I’m totally shocked! She’s ready to turnover… Max has loosely fitted the gauges, so we can see all the pretty lights, he turns the key and THERE THEY ARE! Pweettyy lights! You can hear the fuel pump sucking in a load of fresh petrol and everything seems perfectly normal. With max’s finger hovering over the starter button, we cross all our fingers, toes and everything else crossable …. 3….2…..1…nothing….literally… nothing. Not even an ounce of try. Cheers Fazer… thanks a lot. So back to the drawing board we go. Max is the intelligent one, so while I watched funny cat videos on Youtube, Max took out the starter relay and tested it… also nothing! So easy fix…NEW RELAY!  Down to CMS Motorcycles in Pinhoe, we go, to get a new one, when we arrived and explained to the guy what happened and he said he would test the relay for us on his multi-metre and it made a mysterious ticking noise… just like the bomb in the harry potter puppet video.. if you don’t know what I mean just go onto Youtube.. You’ll find it. Anyway the result was that the relay did work...oh well, after a long chat with the very knowledgeable and helpful guy at CMS we came out with some new ideas and a working relay! The way the Haynes manual tells you to test the starter relay was a little hard to understand… but using a multi-metre is much simpler than first thought and we even managed to nab one off of Max’s dad!

When we got the bike, it was explained that the previous, previous owner - if that makes sense - fitted a really nice alarm, however at some point during its use something went wrong. Hmmmm. To start the bike you had to turn the key and flick a switch under the seat to disable the alarm, this switch also acted as a starter button so once it was flicked over the alarm went off and the bike started. This switch was wired using thin speaker wire and duct tape so was a bit of a mess so this is where we decided to start investigating. Max followed all the wires from the alarm into the wiring loom and took them all out. So we tried starting it again using the started button… still nothing… AAAGGHHHHHHH! Turns out that once that alarm is fitted; its nie on impossible to strip out correctly without ALOT OF PATIENCE and experience. Out of pure laziness and in experience we hit ebay for another loom, as this one was never going allow the bike to start without it afterwards. eBay time! New wiring loom ordered (we checked it had never had an alarm fitted) after what felt like years, but was only really 2 days, the loom arrived. Within about 30 minutes, the old wiring loom had been stripped out and the new one put in place. P.S a wiring loom looks like a snake with loads of heads… I was amused for literally hours! Kept me out of Max’s way I suppose.

We had a spontaneous and crazy idea to bring our ‘mad-as-a-hatter’ springer x cocker spaniel down to the shed to keep us company, so we took down his bed and his blanket and made him a home in the corner of the shed. He. went. NUTS. He was running circles around the Fazer and was playing with everything, he shouldn’t have been playing with.

Note: conventional dog toys don’t work for Gus… he will destroy any dog toy he can get his paws on. So we gave him toys that we thought he would really love… a few intercooler hoses! Yep! He loves them! (They were washed beforehand obviously) That kept him entertained for the rest of the day!
That should now bring you all up to date with the build, any questions or help is very welcome! Hope your enjoying it so far, things will get more exciting and interesting from now! Also there will be more pictures!!

22nd January 2015, One Early Morning!

SOOOO... does anyone get that feeling when you wake up, that you have to start creating as soon as possible?! Yeah we both struggle severely with that -_- so 7am and we were back in the workshop... Max started by stripping the frame of the, so far, unnecessary parts and a good clean... Followed by fitting the front wheel so we can move the thing a bit easier! Next he stripped down the brake system to clean and refurbish it, fit new brake pads, fit the R1 Master Cylinder and reservoir we had spare and renew the brake fluid and as for me... back on the designing I recon!

After a few hours of doodling everything other than bike ideas it’s probably best I go to work and just see what’s happened when I get home! - Em.

So whilst Em was at work, I decided once I'd finished cleaning the engine and rebuilt the carbs to have a crack at getting the engine in place and begin getting the basics of her back together. So I called upon my magicians assistant - My awesome little brother - to help support things in the process. Not an easy job without any stands or decent jacks! Ended up on my tool box on wheels to move the thing :S After consulting Mr Haynes, and working out the order, things needed to be done in, I gathered the brackets and bolts from the many bags and boxes of 'FAZER PARTS' filling the workshop and got too it. 10 back breaking, mind boggling minutes later, it was in position supported on a jack to take a breather... maybe I should have put the oil filter on after it was in the frame, would have been much easier to squeeze in! Don't know why I didn't unscrew it again, there was no oil in it at the time... Anyway, a short while later, if you can call it short? The engine was mounted in place and ready to have all the ancillaries fitted. A few hours later, there's a radiator and coolant system, carbs, fuel pump and coils, clutch lever and cable and a whole lot of wires! One of the last things left in my mind was the airbox which was a bit of an afterthought. Originally we were going to fit cone filters, but after discovering the work involved to get the fuelling set correctly, we decided to stick with the factory airbox. I had forgotten that when putting the engine in... After checking in with Haynes again, my heart sank... "REMOVAL: Step 1 - Remove the Engine"etc... "INSTALLATION: Installation is the reverse of removal" etc... Determined that there must be another way, I examined the situation, I removed the carbs and took as much stuff off of the airbox as I could, and we have lift off! Thank god for that! So airbox in place and back together, carbs back on, I filled her with new Oil and began to fit the tank and fuel supply, only to realise there's no fuel filter. On the blower to the previous owner, I found he had
 one that was supposed to come with the bike. Emily popped round to pick it and the battery (also forgotten) up. When she returned home, she was shocked to see the amount of work that had been done! Whilst I finished fitting the fuel tank and filter and a few other things - tightening clamps etc- she got straight back to the designing… after we both stopped to refuel that is. - Max

The designs are really starting to come together and looking like final plans. We can’t wait to get this project finished, it’s already starting to look… well… beautiful I can’t resist taking a break from doodling to have a sit on the old girl, and make bike noises like a complete idiot, but we can all dream can’t we?! It's Slowly coming together! - Em.

Apologies for the lack of photos! There'll be more we promise!
 
 
Taken pre airbox installation!

21st January 2015 LET IT BEGIN!

SO TODAY IS THE DAY! We finally picked up the Yamaha Fazer 600!
We loaded it into Max’s brother’s florescent yellow van and away we went! ... Then back we went an hour later realising we had forgotten the keys for the bike!


Good start…

First thing to do is stand and stare. What a beautiful mess.

With the engine on the workbench Max gets to work and I play games on the computer! ;) He started by stripping the engine down ready for a good clean out. Then stripping the frame down of currently unnecessary parts, for example the number plate, rear light, indicators etc...


I’ve given up on the games because quite frankly I’m crap! So instead I occupy myself with some designing… we know roughly what we want but as we now have the bike we probably need a better idea before we get too far in! … We need to decide the shape of the tail, shape of headlight, placement of rear lights, number plate and reflectors etc.

We knew from the start we wanted a cafĂ© racer with a modern twist… Just how to do it...

That shall slowly be unveiled along the way!


Hang around, more on the way shortly :)


Pre-Post!

So, first post on the new blog? Not at all in the spotlight!! You'll have to forgive us, we have had the bike for a few weeks and started work on it immediately and only just started this blog. That means there will be a few posts very close together with not many photos, but not for long! Nothing important, on the custom side at least, has been done yet. Only checking over the engine and getting her running (not yet succeeded), the custom work is yet to begin!

Hang around, the first build post is on its way!